


With the release of the iOS 11.2 update late last year, Apple launched a much-anticipated new feature called Apple Pay Cash, which gives you the ability to send and receive money from friends, family and other iOS users through the Messages app.
This is incredibly useful and convenient. For example, when a colleague pays the lunch tab and you want to transfer your share of the bill to them, or when your friends need to pay you back for the concert tickets your purchased for them. Transferring funds like this is completely free, so long as you associate your debit card with your Apple Pay Cash account.
Let’s take look at how to set that up.
Apple Pay Cash Requirements
As of this writing, Apple Pay Cash is only available in the United States. In order to use Apple Pay Cash, you have to be using a device that can run iOS 11.2. This includes the iPhone 6 and 6 Plus and all iPhone models released after them. For a complete listing of devices, check this Apple Support page.
You also need to enable two-factor authentication for your Apple ID, if you haven’t done so already. This provides an extra layer of security, which is especially important if you’re going to be using your iOS device to transfer funds to and from your bank account.
To enable two-factor authentication on your device:
- Go to Settings > [Your Account Name] > Password & Security.
- Tap Two-Factor Authentication to turn it on.
- Tap Continue. You’ll then be prompted to enter a phone number where you’ll want to receive verification codes.
After setting up two-factor authentication, any time you sign into your Apple ID account on any iOS device, Mac or website, you’ll be prompted to enter the verification code that will be sent to the phone number you entered.
How to Add a Debit Card
Next, you’ll need to add a debit card to the Wallet app on your device, if you haven’t yet done so. You can also use a credit card with Apple Pay Cash, but that incurs a 3 percent fee when you send money, while it’s completely free to send money when using a debit card.
To add a card to your device:
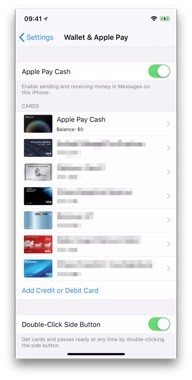
- Go to Settings > Wallet & Apple Pay
- Tap Add Credit or Debit Card
- Follow the on-screen instructions to add a new card using your debit or credit card information. Depending on your bank, you’ll be prompted to confirm your card via text message, email, or phone call.
- Once your card is verified, return to Settings > Wallet & Apple Pay and enable the Apple Pay Cash switch and follow the onscreen instructions.
You can also transfer balances directly your bank account.
How to Use Apple Pay Cash in Messages
In order send or receive money from someone, they’ll need have set up Apple Pay Cash on their own device. To transfer funds, open up the Messages app and either select a previous conversation with the person you need to send funds to, or create a new message.
You should see the Apple Pay Cash button at the bottom of the screen. Tap it to open the Apple Pay Cash interface.

From here you can tap the + or minus buttons to specify the amount of money you want to send or request or tap the amount to open the keypad and manually enter a value, which is useful when you need to transfer amounts other than whole dollars.
If you’re sending this amount, tap Pay. Your friend will receive a message indicating that you’ve sent money, and they’ll be able to tap it transfer the funds to their Apple Pay Cash card.
Or, if you’re asking your friend to send you money, tap Request, and they’ll receive a message they can tap to send you that amount. And once you receive their funds, the money will be added to your Apple Pay Cash balance. Once you have a balance on your card, you can keep it there to use on other purchases you make with Apple Pay, or you can transfer some or all of the balance to your bank account.
To transfer the balance, you’ll need to back to Settings > Wallet & Apple Pay and tap the Apple Pay Cash card. The first time you do this you’ll be prompted for your bank account’s number and routing number. Once that’s set up, you’ll be able to transfer money to your account.
Be aware that while you can instantly spend and send money from your Apple Pay Cash card when using Apple Pay, transferring money from it to your bank account can take 1 to 3 business days.
To learn more about setting up Apple Pay and using the most important features of iOS, check out the course iOS 11: iPhone and iPad Essential Training.
Other LinkedIn Learning courses you might be interested in are:
- Time Management Tips
- iMovie 10.1.8 Essential Training
- iOS 11: iPhone and iPad New Features
- PowerPoint Quick Tips
- Body Language for Leaders

Topics: Productivity tips
Related articles